


Featured comment

“Made it for the first time, following directions exactly, proofed in the oven with the light on overnight. It took 11 hours to ferment. The smell tip is handy. Baked for 90 minutes then cooled completely and had it with avocado…didn’t even wait to toast it! Delicious gluten free alternative! Next time I may try adding curry powder and sun-dried tomatoes to the mix before baking”
This 1-Ingredient Gluten-Free Buckwheat Bread recipe is an absolute game-changer! I’ve been making it every single week since early 2022, and it never disappoints! It’s incredibly easy, delicious, and super nourishing. I highly recommend throwing a couple of slices in the toaster/oven to create the ultimate avocado toast or as a side dish for dipping into soup. It even makes amazing croutons in a salad!
Since sharing this recipe with our community on social media, it’s become one of our most popular recipes to date. Hundreds of our community members have shared their versions with us on Instagram. Check out our Buckwheat Bread Instagram Highlights to see just a sample of the ones we’ve received, and please make sure to share your own!
If this bread is your thing, try our Easiest Red Lentil Bread Recipe for a quick gluten-free option (no fermentation needed) or our 2-Ingredient Buckwheat Spinach Wraps using the same hulled buckwheat groats. For more gluten-free bread variety, browse our Red Lentil Quinoa Bread, Gluten-Free Seeded Bread, and Dosa Red Lentil Wraps.

Ingredient Notes

- Raw Hulled Buckwheat: Buckwheat groats (or kernels) are the hulled seeds of the buckwheat plant. For this recipe, we can only use raw hulled buckwheat (also known as green buckwheat). Any other kind won’t work here. Despite its name containing the word “wheat,” buckwheat is actually gluten-free and makes for a fantastic bread ingredient. These groats are a staple in many Eastern European and Asian cuisines, known for their nutty flavor and versatile use.
- Water: Tap water is fine to use depending on your location, if the water is heavily chlorinated in your area, you should choose filtered water, as chlorine can impact the fermentation.
- Salt: Either sea salt flakes or table salt works fine. The salt enhances the natural flavor of the buckwheat. Add only a little bit for best fermentation
- Optional Seeds: Adds a delightful crunch and visual appeal to the bread. They are optional but highly recommended for an extra touch of flavor and texture. You can top it with any seeds you like. My current favorite combination is pumpkin seeds and sesame seeds. Poppy seeds are also lovely here. Just avoid chia seeds.
IMPORTANT: Use ONLY raw hulled, non-roasted buckwheat for this recipe (the green kind). Buckwheat flour, unhulled buckwheat, activated buckwheat, kasha, toasted or roasted buckwheat will not work in this recipe.
Why You’ll Love This 1-Ingredient Buckwheat Bread Recipe
- Delicious and Dense: It’s absolutely delicious, with a dense, satisfying texture, and gets even better when toasted! Fermentation not only enhances the flavor, but it can improve the bioavailability of certain nutrients in foods. Specifically, the fermentation process can reduce levels of phytic acid, which is known to bind some minerals and reduce their absorption. By breaking down phytic acid, fermentation can make minerals like iron, zinc, and magnesium more available for absorption by the body.
- So Easy: Although the fermentation process takes a bit of time, this recipe is very hands-off and only requires about 10 minutes of actual work. If you use the right kind of buckwheat, a high-speed blender, and follow the instructions, this simple, yeast-free bread recipe is practically foolproof.
- Cost-effective: Good quality, nourishing, gluten-free bread can be quite expensive where we live, often costing around $15 AUD (~ $9.80 USD), whereas this Gluten-Free Buckwheat Bread comes in at under $3.50 AUD (~ $2.30 USD), even when using organic hulled buckwheat.
- Meal-Prep: Easy to prep in advance and can be frozen. I usually keep half fresh, wrapped in a clean kitchen towel, to consume over the next few days, and slice and freeze the rest (which also adds extra health benefits by creating resistant starches, making it even better for gut health and blood sugar control). Toast when ready to eat, and I think it’s even better than fresh! This way, you can toast a piece whenever you feel like some delicious bread.
What Are the Health Benefits of Buckwheat?

- Buckwheat is highly nutritious, offering a source of fiber and essential minerals, especially magnesium. It’s also packed with antioxidants, particularly rutin, which supports blood vessels and circulation, and is great for heart health. Despite its name, buckwheat is naturally gluten-free, making it suitable for those with gluten intolerance or celiac disease.
- Buckwheat’s low to medium glycemic index makes it a good choice for those managing blood sugar levels. Plus, its high fiber content aids in digestion.
- Like amaranth or quinoa, these whole grain groats can be cooked like rice or oats, making them a fantastic ingredient for various dishes. From traditional porridge and pilafs to modern salads and even as a rice substitute, buckwheat is incredibly adaptable. It’s also used in making buckwheat flour, a popular alternative for gluten-free baking. We use buckwheat flour to make these High-Protein Buckwheat Pancakes with Blueberry Syrup, and they’re so fluffy and delicious!
Step-by-Step Instructions
Rinse the raw hulled buckwheat kernels under cold water until clear. After rinsing, soak 2⅔ cups (500g – 17.5 oz) of buckwheat in cold water in a large bowl, fully submerged, and cover with a clean cloth. Keep in the fridge for about 6 hours.


Once soaked, drain the remaining water, but do not rinse.


Transfer to a blender with ¾ cup + 2 tbsp (210 ml – 7 fl oz) of water and ¼ tsp salt. Blend at low speed, gradually increasing, until you get a very smooth texture with no pieces left. Pour the blended buckwheat mixture back into the bowl.

Cover it with a kitchen cloth and let it sit at room temperature for 12 to 24 hours to ferment. Please check the fermentation table below to confirm the time required based on your current climate.


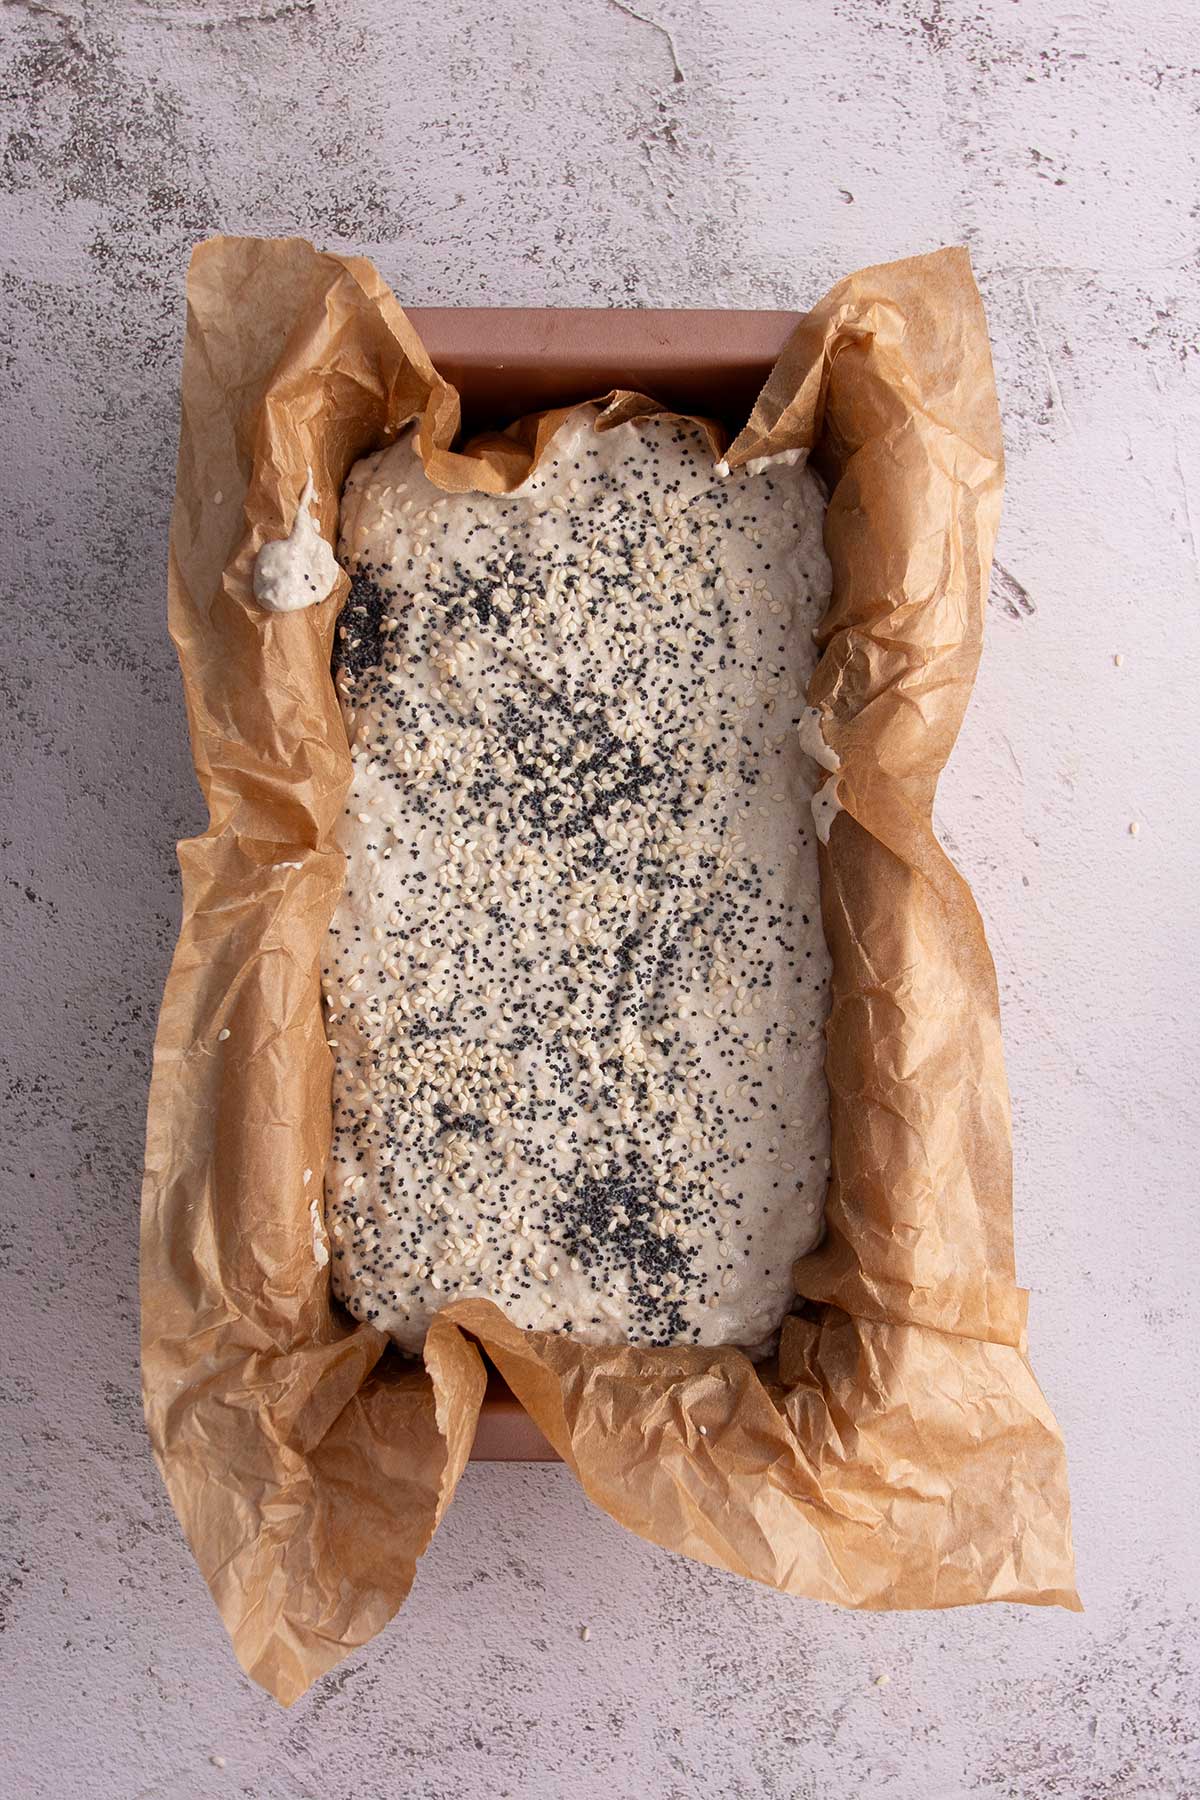
When you’re ready to bake, preheat your oven to 350°F (180C) fan on. Line a loaf pan with baking paper and pour the fermented buckwheat dough into the pan. If you’d like, sprinkle the top with seeds.

Bake the bread in the preheated oven for 90 minutes. The bread should be golden brown and firm to the touch. Remove from the loaf pan.


Allow the bread to cool down before slicing. This makes it easier to cut and improves the texture. Enjoy your homemade, nourishing, gluten-free buckwheat bread!

How Long to Ferment Your Buckwheat Bread Based on Your Current Climate
🌨️ Colder (Winter)
Soak: 6–7 hours (can be left on the counter, but fridge is recommended)
Recommended Fermentation time: 24 hours
Note: Place the bread in a warm spot or near a gentle heat source to help it ferment. An oven with the light on is a great place to keep it. Avoid drafty places.
Example: In Sydney winter, I keep mine near the stove (I cook a lot), and ferment for 24 hours.
☀️ Warm (Summer)
Soak: 6–7 hours in the fridge
Fermentation time: From 12 to 20 hours
Note: A warm environment speeds up fermentation, so check the texture for bubbles after 12 hours.
Example: In Sydney Summer, in a temperate home with AC, I ferment mine for about 20 hours.
🔥 Very Hot
Indoor temperature range: Above 85°F (30°C)
Soak: 6 hours in the fridge
Fermentation time: As little as 6 hours
Note: The hotter it is, the less time needed.
Example: People in the community in hot, steamy temperatures, such as Malaysia, have reported good results in fermenting as little as 6 hours.
Keep in mind that every home environment is a little different; temperature and humidity can affect the result. I recommend using a glass loaf pan the first time so you can monitor the texture and see the internal bubbles as it ferments. Most people get it right on the first try, but if you don’t, don’t be discouraged. There may be a slight learning curve with this one. The first time you make it, set a few timers to check on how it ferments. It’s absolutely worth it!

1-Ingredient Buckwheat Bread (Nourishing and GF)
Equipment
Ingredients
- 500 g (2⅔ cups) raw hulled buckwheat kernels - MUST be hulled, raw buckwheat groats for this recipe to work
- 210 ml (¾ cups + 2 tbsp ) water
- 1 ½ g (¼ tsp) sea salt flakes
- seeds - optional – see notes
Instructions
- Soak the buckwheat: Rinse the hulled buckwheat kernels under cold water until the water runs clear, removing any dust or impurities. Transfer the rinsed buckwheat to a large bowl and cover with plenty of cold water, ensuring the kernels are fully submerged. Cover with a clean cloth and refrigerate for 6 to 7 hours. (see notes)
- Drain: Using a fine-mesh sieve, drain the soaked buckwheat briefly. Avoid over-draining (no need to let it sit in the sink for minutes). A little residual liquid (yes, it's a little slimy) is perfectly fine and will actually help with the texture.
- Blend: Transfer to a high-speed blender with 210 ml (¾ cup + 2 tbsp) water and the salt. Blend at low speed to get the blades moving, then slowly increase speed until you reach a very smooth texture with no buckwheat bits remaining. Add up to 2 tbsp of extra water if needed.
- Ferment: Pour the blended buckwheat batter back into the bowl. Cover and let it sit at room temperature for 12 to 24 hours (timing will vary depending on your climate; refer to the timing chart and tips above to double-check). Once fermented, you will notice the mixture should be slightly bubbly inside.
- Assemble: Prepare a 24 x 13 x 7 cm (9.5 x 5 x 2.75 inch) loaf pan and line with baking paper. Pour the fermented buckwheat batter into the prepared pan. If using, sprinkle the top with seeds. If you're in a cold climate, or feel your batter could use a little more fermentation, let it sit in the loaf pan for an extra hour near a source of warmth.
- Bake: When ready to bake, preheat your oven to 350°F (180°C) (347°F (175°C), fan on). Bake on the middle to upper rack for 90 minutes.
- Cool down: Remove the bread from the loaf pan and let it cool completely before slicing. This step is important for the best texture. Enjoy your homemade buckwheat bread!
Notes
Video
Per Serving/Portion
FAQ
How long should I ferment the bread?
There is a smell to my bread. Is that normal?
However, it should NOT have a highly unpleasant fishy smell. This means the batter has over-fermented. Refer to the fermentation chart, and use timers to check on the batter the first time you make it to avoid this happening (especially in warmer climates).
Is this buckwheat bread recipe gluten-free?
Can I use a substitute for buckwheat in this buckwheat bread?
Can I use buckwheat flour?
How long does this bread last?
Can I freeze this bread?
Can I use other ingredients in this bread?
Can I skip the salt?
Does the dough rise after fermentation?
I’ve left my buckwheat to soak for more than 7 hours. What should I do?
If it was not placed in the fridge to soak, I would recommend rinsing the buckwheat and using it in another recipe, as the bread might otherwise develop a slight smell. It should still be fine to consume, just not ideal before fermenting.
Should I soak the buckwheat in the fridge or on the counter?
Do not leave it in the fridge during fermentation.
Can I slice my bread straight away when it’s out of the oven?
My bread didn’t rise – what can I do differently?
The second important factor is fermentation time. If your bread didn’t rise and you used the right kind of buckwheat, the fermentation likely didn’t take. Refer to the fermentation chart above the recipe and make sure you followed all the tips, including keeping your batter near a source of warmth, or in the oven with just the light on, if your home is particularly cold or drafty.
Next, check that you didn’t add too much salt, and that your water wasn’t high in chlorine. This is why filtered water works best for some people.
A less common cause is using an iron, aluminum, or copper bowl, all of which can hinder fermentation.
Once you’ve poured the batter into the loaf pan, if you feel it could be slightly more fermented (especially if your home is currently cold), leave it near a source of warmth for 1 hour before baking.
If none of this helped, leave a comment below with a photo of your bread, and your exact process, and we’ll figure it out together. I’ve helped thousands of people make this recipe, and I’ll make sure you get your delicious buckwheat bread too!
My blender is overheating or has a burning smell, what should I do?
Why is my bread dense, gummy, or slumped in the middle?
Can I skip the fermentation or use yeast to make it rise faster?
Can I try this with other grains like teff, quinoa, barley, or sorghum?
You might also like


Straight from your kitchens.
Snap a photo in the comments on any recipe. We love to see it! Here’s what the community has been cooking recently.


Just leave a comment on any recipe and attach a photo


I bought buckwheat just to try out this recipe because it just seemed too incredible and it kinda is… my blender took a long time to do its work and it wasn’t entirely the same as the picture (there were visible bits) but I touched it and the texture was fairly smooth and so I just let it ferment. My blender is the attachment for a stand mixer so probably not powerful enough. I live almost along the equator (Singapore!) and I let it ferment for about 14 hours (coz I had to go to bed) and I could smell it when I walked into the kitchen this morning. The duration of the bake seemed really long but… it worked. I just had my first taste of the bread end, toasted and slathered with butter and it was tasty! Chewy and crusty, qualities of fine bread and I liked the distinct taste too. Definitely will try this again with a shorter ferment time to see if there’s any change in the taste.
Hey Min, thanks for sharing your experience, I’m so happy you’re enjoying the bread! Some people in very hot location have reported good results with fermenting as little as 6 hours, let us know how you go next time 😍
Followed instructions exactly and nothing like the images shown appeared. Had to use 3X water and still had to remove the batter by hand it was so thick and it did not appear to ferment after 24 hours. Very disappointed in this .
Hi Mikee, I’m sorry you didn’t get good results! From what you are describing, the wrong kind of buckwheat was used. This recipe will only work with raw (green) hulled buckwheat. Roasted (even slightly) or hulled, retain too much water, and won’t ferment or cook properly. Hope you give it another go, it’s been a game changer for us 💚
Cooked this for the first time today after recently going gluten free and stumbling across this recipe. I fermented it for 20hrs in a NZ spring climate. It would have been helpful to know what function you used on the oven but I worked it out. It turned out PERFECT first go (so pleased), hard crust and moist yet firm interior, very bread like. Tastes great too, very happy I tried this and thanks so much for the amazing recipe!
Hey Jasmine, I’m so happy you’re loving the bread 💕
This worked reasonably well, I like the taste and texture (I had to ferment in my proving drawer as my house is only around 17c. However my grease proof paper liners wouldn’t come away from the loaves and I ended up having to cut them away. Maybe because I chose to ferment in the loaf tins for the final few hours. What loaf tin liners do you recommend? (UK)
Hey Jane, I’m glad you like the bread! I have not had this issue even when fermenting in the loaf pan, I’m in Australia, but hopefully someone else in the community from UK can help with brand recommendation 🙂
You can wet the paper liner with water and crumple it nicely before putting in the loaf pan. This gives the right shape to the dough as well as prevent it from sticking on the bread.
Great recipe can I add some yeast
Hey Maria, I have not tried, let us know if you do!
I love this recipe ! So easy and minimal ingredients, the texture is fluffy and hearty. I’ve been looking for an easy and tasty gluten free bread recipe for a long time. My son has to be gluten free and loves this bread, will be making weekly, healthier and cheaper than getting store brought bread !
Hey Zahra, I’m so happy the bread was a hit with your son! Thank you for sharing 💕
I love this bread and I’m not even GF! Toasted in skillet with some olive oil, its crispy goodness is heavenly with my tofu scramble. And it couldn’t be easier. Thank you for this delicious recipe!
Hey Kim, toasted on the side of some tofu scramble is also one of my favorite way to enjoy it! So happy you’re loving it 🥰
I just did the recipe and it turned out great! I live in Sweden and its quite cold, so for the fermenting process I just kept the dough in the owen with only the light on and it worked. It was fermenting for 16 hours.
Thank you so much for the recipe!
Hey Sophia, I’m so happy you’re enjoying the recipe! Thanks for sharing your tips on fermenting time for colder weather, it’s super helpful 💚
Hi Sarah, your website is a fantastic resource, thank you! I have a particular connection with certain foods, and buckwheat is one of them. I’ve been making buckwheat bread for about seven or so years now. It’s a staple for me. I adjust my soaking and fermenting times slightly depending on the time of year / temperature (here in Australia). I vary the additional ingredients too, but mostly stick to adding psyllium husks, sunflower, pumpkin and hulled hemp seeds (which I add with the salt after draining the groats from their initial soak, often as long as 48hrs). That all gets blended up to ferment together for another 12-24 hours. Then I bake it for 50 mins in a medium low fan forced oven. It then gets sliced up and frozen. I never tire of eating or making it. And it gives me the fibre I need each day. I have a slice with avocado or an egg quite often. Thanks too Sarah, for ceating a great opportunity for others to share their experiences as well!
Cheers,
Fiona
Hey Fiona, thank you so much for your kind words, I’m so happy you’re enjoying the website! And thank you for sharing your beautiful recipe with the community 💚
I let ferment 24h at 76deg , when I poured it to bake it, I noticed it was unevenly distributed with a part more liquid. Why is that? I mixed it up before baking. It came excellent but I think not rising/floofy enough and one end was slightly less rised than the other end. What did I do wrong?
Hi, what about adding shredded carrots? Does that work?
I have not tried, would love to hear how you go if you try it!
Not sure what happened, I followed the recipe as exactly as I could but wound up with a rubber brick. 😂😭
Used Yupik brand organic raw, hulled white buckwheat. The kitchen was about 75-77 F so I started checking at 12 hours. By 21.5 hours there were only a couple bubbles near the edge & it didn’t seem to have risen at all but had a mild, lightly fermented smell. I was afraid it might over-ferment so I went ahead & baked it. But it’s about 1.5″ thick, a total bust. 😞
I think it just wasn’t fermented enough, even though it should have been, based on the chart. Can you go into a little more detail about how fermented it should smell? Like a regular yeasted dough? A beer?
Also, like another commenter, my mighty Vitamix really struggled with this, despite adding exactly the amounts of groats & water (& a 6:45 soak). Had to use the tamper & by the time it was all uniformly blended it was quite warm. Could you say a bit more about what consistency the batter should have? I’m wondering if mine was too dry.
Hoping to nail this because everyone else seems to love it! Thanks! 😊
Hi Holly, thank you so much for sharing all the details and giving the recipe a go 💚 Can I ask, what’s the current temperature in your house? Sometimes houses can be a little drafty even if the thermometer says one thing, so I’d recommend letting it go for the full 24 hours to be safe.
A few tips that might help next time:
If your house gets a lot of wind, is extra cold, or you’re running the air con, you can ferment the batter in the oven with just the light on—it creates a more stable, warm environment.
Use a glass bowl so you can see the tiny bubbles forming in the batter (that’s the best sign it’s fermenting well).
Try filtered water if possible, compounds like chlorine in tap water can sometimes slow fermentation.
After pouring the batter into the loaf pan, let it ferment for an extra hour before baking to give it a little more lift.
For the Vitamix, you can add up to 2 tbsp of extra water to help get it moving. Start blending slow (speed 1–2) just to get the blades going, then gradually increase. That usually does the trick—I’ve never needed the tamper and mine is 8 years old 🙂 The batter should be thick but pourable, not dry, you can refer to the video for visual cues.
I hope this helps! Don’t be discouraged—it can take a little trial and error depending on your environment, but once it clicks, it’s such a great recipe. You’ve got this! 💚
Can’t live without this delicious bread for my avocado toast!! Best gluten-free bread recipe ever. Buckwheat pancakes, buckwheat bread… I want buckwheat everything now!
Hey Cameron, I’m so happy to hear that! Thanks for sharing 💚
Thanks for this delicious and easy gf bread recipe, Sarah! It turned out perfectly (although it took 36hrs to ferment in southern NZ winter 😉).
As the slices are quite small, I was wondering if doubling the ingredients to create a taller loaf would work the same? Or would this affect baking time?
Hey Maja, so happy you liked it! And thanks for sharing your tips! It would affect the baking time, but I think it would work maybe you could try using a more narrow loaf pan. Let us know if you try 🙂
To accelerate fermentation next time, you could try leaving the dough near a source of heat or in the oven that’s been slightly warmed up before 💚